
There are no products in your shopping cart yet.
Dynamic range and GND filters
Dynamic range is a frequently heard slogan, but what exactly does it mean? In this blog we will explain this in detail and indicate why it is so important.
What is dynamic range?
Dynamic range refers to the contrast difference that must be captured in an image and to what extent you can still register details in the shadows and highlights.
There is no camera so good that it can surpass our own eyes. The accommodation power, the focusing speed, and the ability to bridge great contrasts are unprecedented for our eyes. For example, when you look into the backlight, you can still see details in the white areas, but our eyes can still distinguish details in the shadow areas as well.
Our eyes have a dynamic range of 24 stops under optimal conditions, and a professional SLR camera has approximately a dynamic range of 14 stops, clearly less than our eyes.
The dynamic range is therefore expressed in stops.
Stops are used to indicate adjustments in exposure, a stop is equal to doubling or halving the light hitting your sensor.
There you have it again: "the exposure triangle"
Shutter speed, if you go from 1/125 sec to 1/250 sec, you reduce the light by 1 stop, if you go from 1/125 sec to 1/60 then you increase the light by 1 stop.
Aperture, if you go from f/8 to f/5.6, you have 1 stop more light, if you go from f/8 to f/16, you have 1 stop less light.
ISO, if you go from 100 ISO to 200 ISO you have 1 stop more light, if you go from 400 ISO to 200 ISO you have 1 stop less light.
To get the most out of your camera, a large sensor is important. As a rule, the larger the sensor, the wider the dynamic range.
The more surface area, the larger the pixels and the more light falls on the individual pixels and therefore the greater the dynamic range. This means that Full-frame sensors often have a greater dynamic range than APS-C sensors and Micro-Four thirds (MFT).
The more surface area, the larger the pixels and the more light falls on the individual pixels and therefore the greater the dynamic range. This means that Full-frame sensors often have a greater dynamic range than APS-C sensors and Micro-Four thirds (MFT).
Another factor is the number of bits of color that a sensor stores. A sensor with 8 bit color therefore has a smaller dynamic range than a sensor that stores color in 24 bits.
We all know that the ISO value determines how sensitive your sensor is to light, what is also important to know is that when you increase your ISO value you get more noise in your image, this noise gets significantly worse, as you trying to retrieve information from the shadows, which then reduces your effective dynamic range.
So for the greatest possible dynamic range: use a tripod so that you can use the lowest possible ISO. The best ISO value is therefore the lowest NORMAL value. This is often ISO 100
So for the greatest possible dynamic range: use a tripod so that you can use the lowest possible ISO. The best ISO value is therefore the lowest NORMAL value. This is often ISO 100
Another way to make the most of your dynamic range is to photograph in RAW, this format stores a lot more information than JPEG, but has the disadvantage that they are very large files, but they have the advantage that they contain an enormous amount of 'raw ' store data, which is good for the dynamic range. If you are not completely satisfied, you can often reveal additional details in a RAW file if you post-process the images with photo software on the computer.
The best part is the images straight from the camera, but that sometimes takes some practice and perhaps following a workshop can help you achieve your goal.
The best part is the images straight from the camera, but that sometimes takes some practice and perhaps following a workshop can help you achieve your goal.
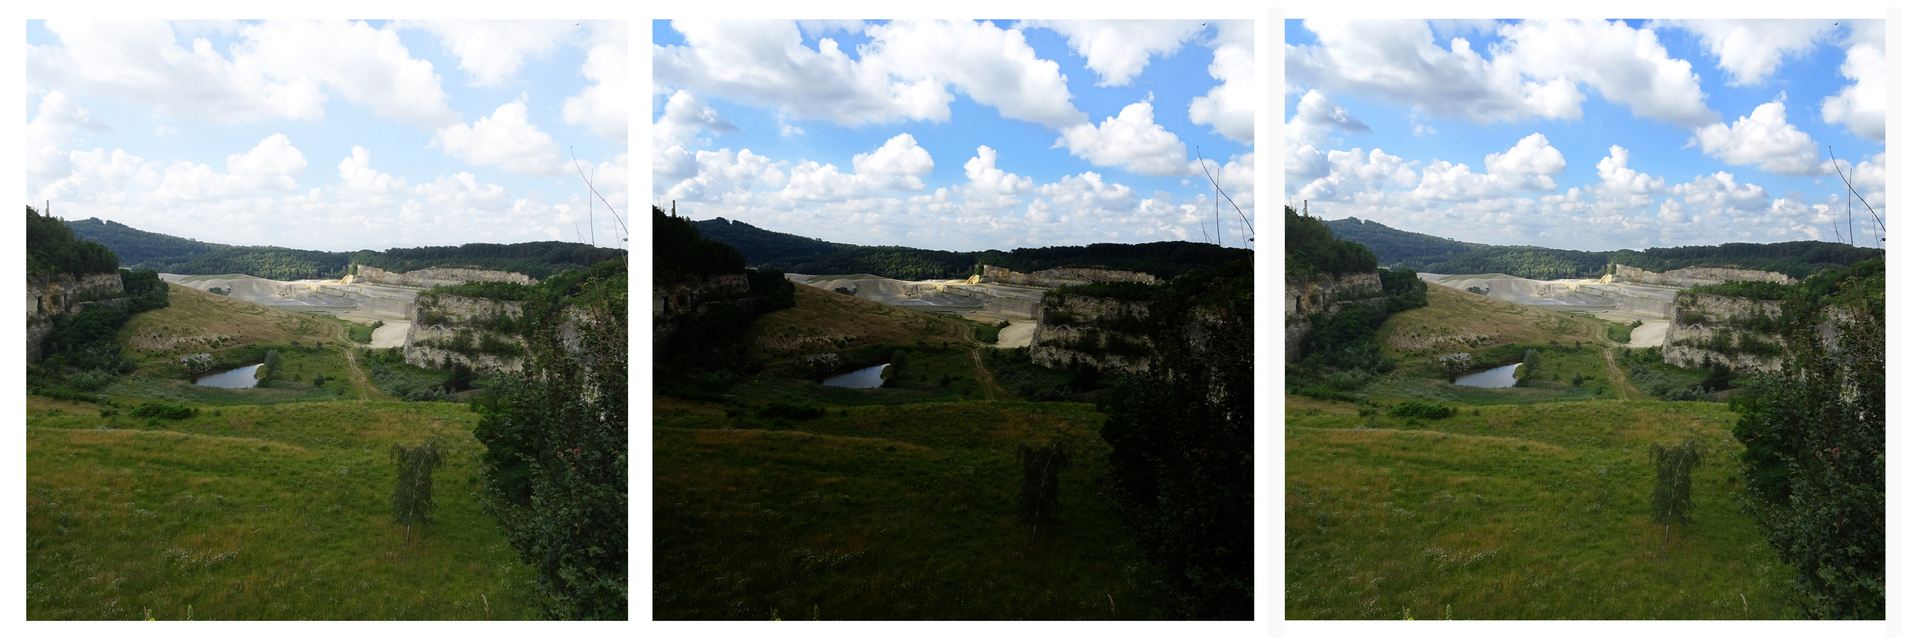
When we take a photo with great contrasts, we are faced with a dilemma, either detail in the sky or detail in the foreground.
You can improve much of the exposure by choosing a different light metering method. Use spot metering instead of matrix metering or use exposure compensation on the camera. But no matter how you solve the puzzle, your camera cannot handle these kinds of major differences. A good tool is a fill-in flash, but then your main subject should be no further than 2-3 meters away from you.
When we photograph landscapes this is not the case, of course, then we have another perfect tool to increase the dynamic range of our camera and balance the exposure.
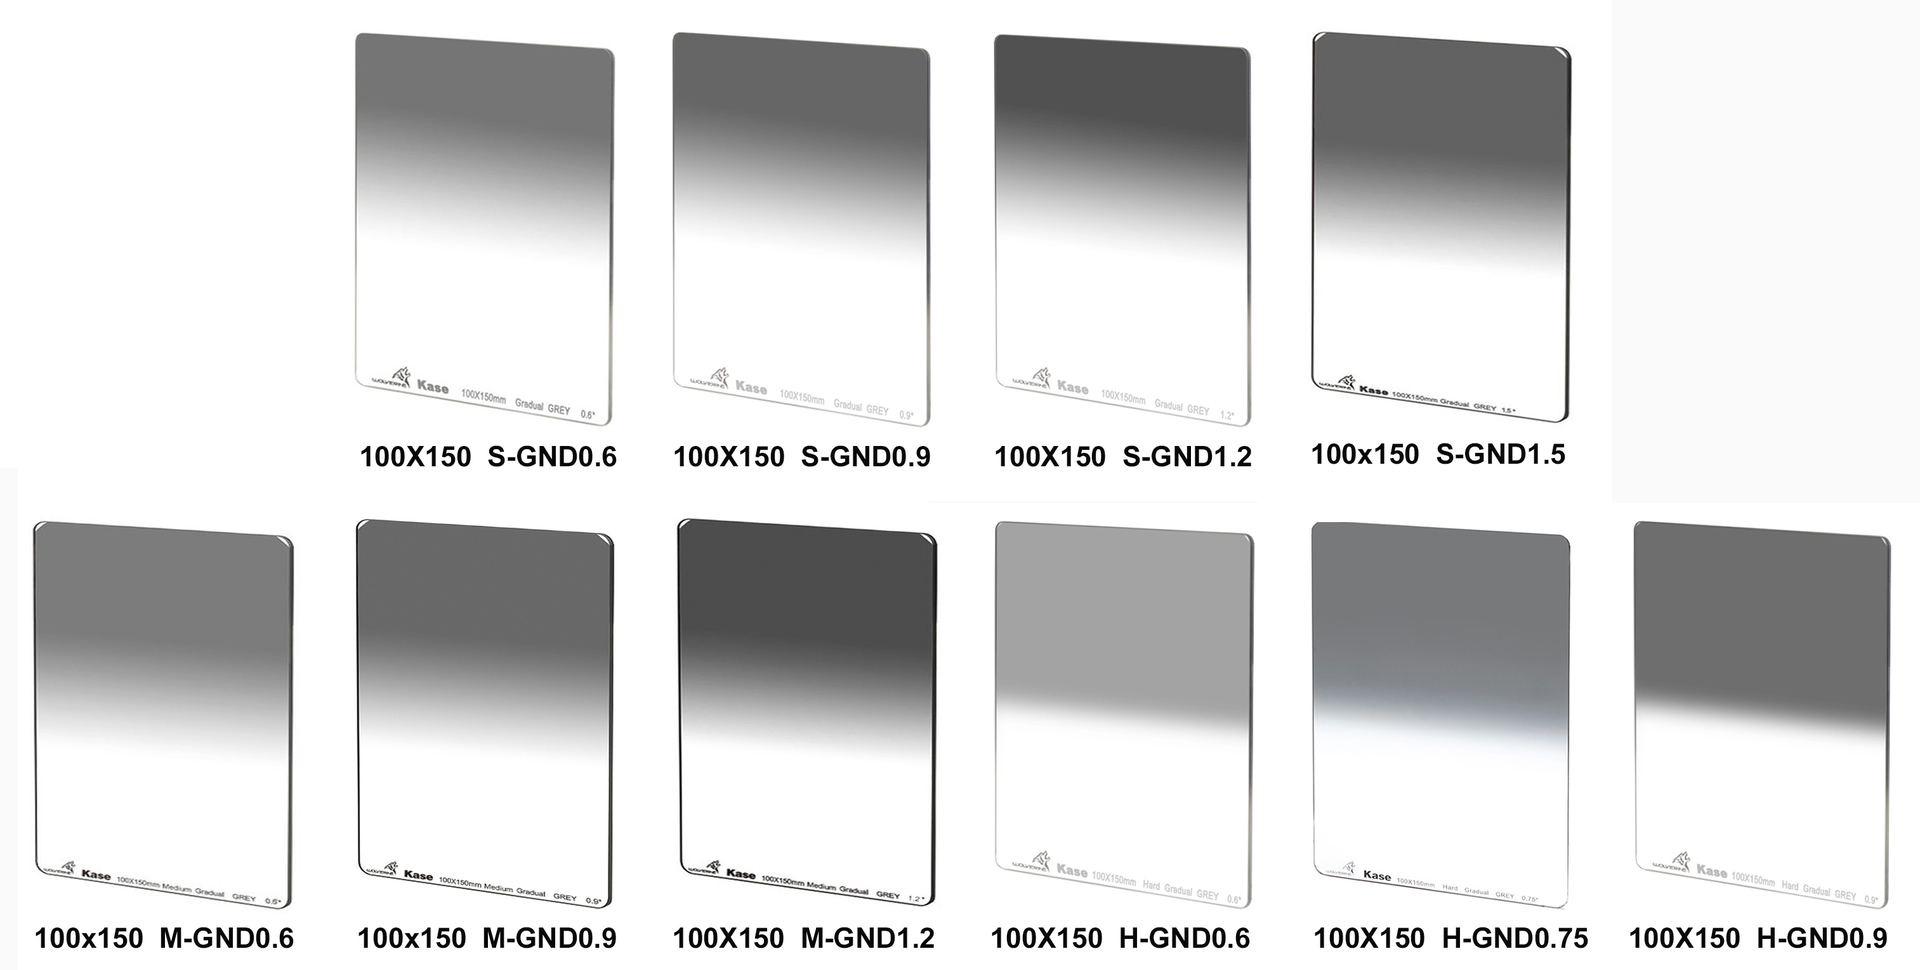
GND or Gray gradient filter, Gradation filter
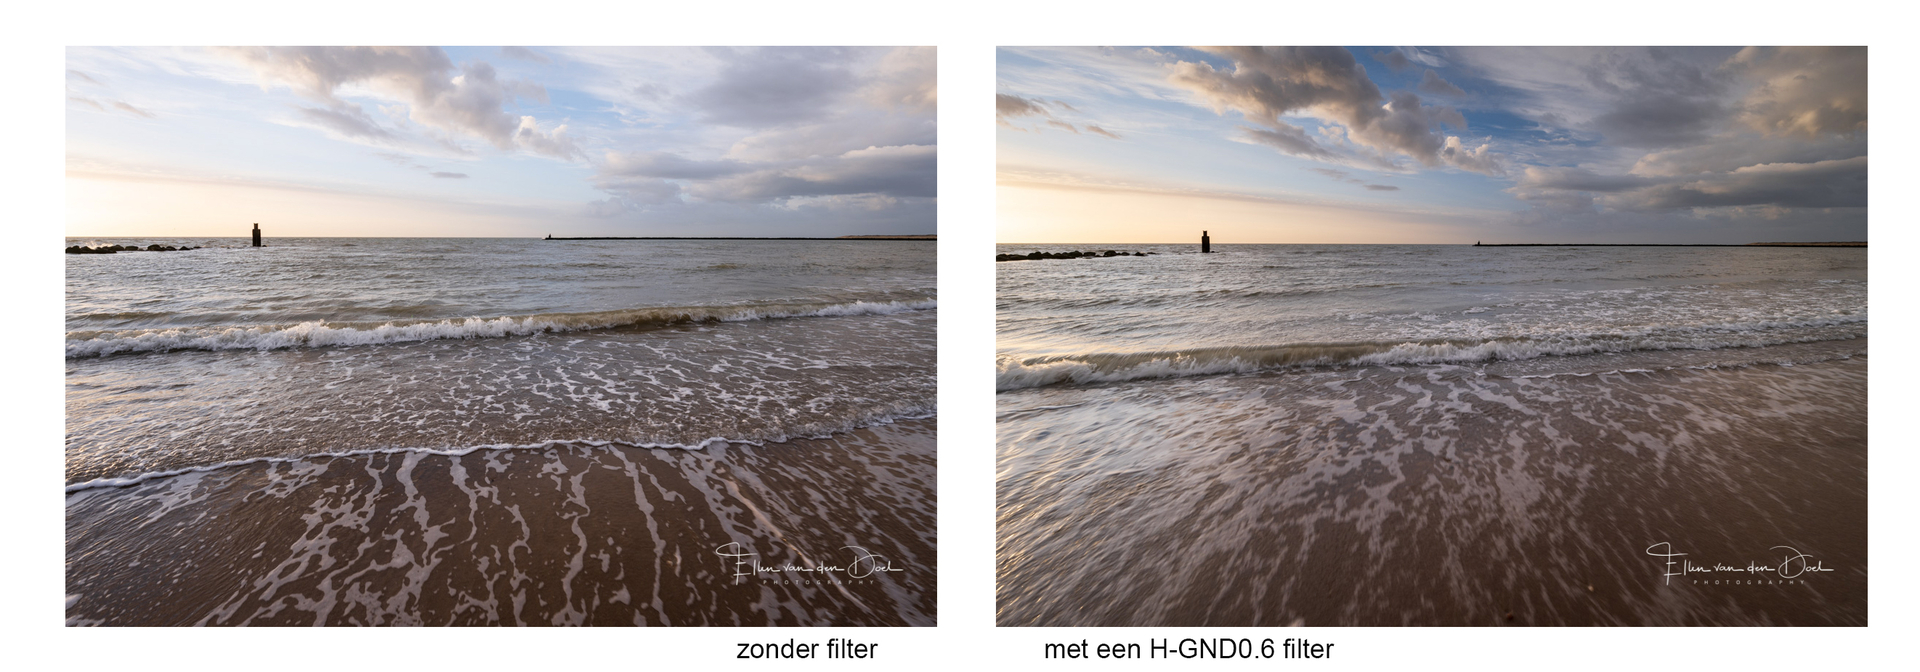
These filters are gray transparent at the top and halfway down they transition to completely clear glass at the bottom. You place the gray gradient filter on your lens in a holder, so that the gradient from gray to clear is on the horizon/transition, this may take some time, but once it is in the right position, this filter blocks the light from the sky, giving you a greater dynamic creates reach. You see more details in the sky, while you can properly expose the foreground, thus bringing balance to your image recording.

Just like the ND filters, they have different densities, but also different types of transitions.
The soft transition S-GND is most suitable for a horizon/transition that is not completely straight and where there are also objects in the transition, such as trees.
A filter with an M-GND has a slightly harder gradient, but can also be applied to transitions that are not entirely straight, but be careful with buildings and the like that you do not see a transition stripe in your photo.
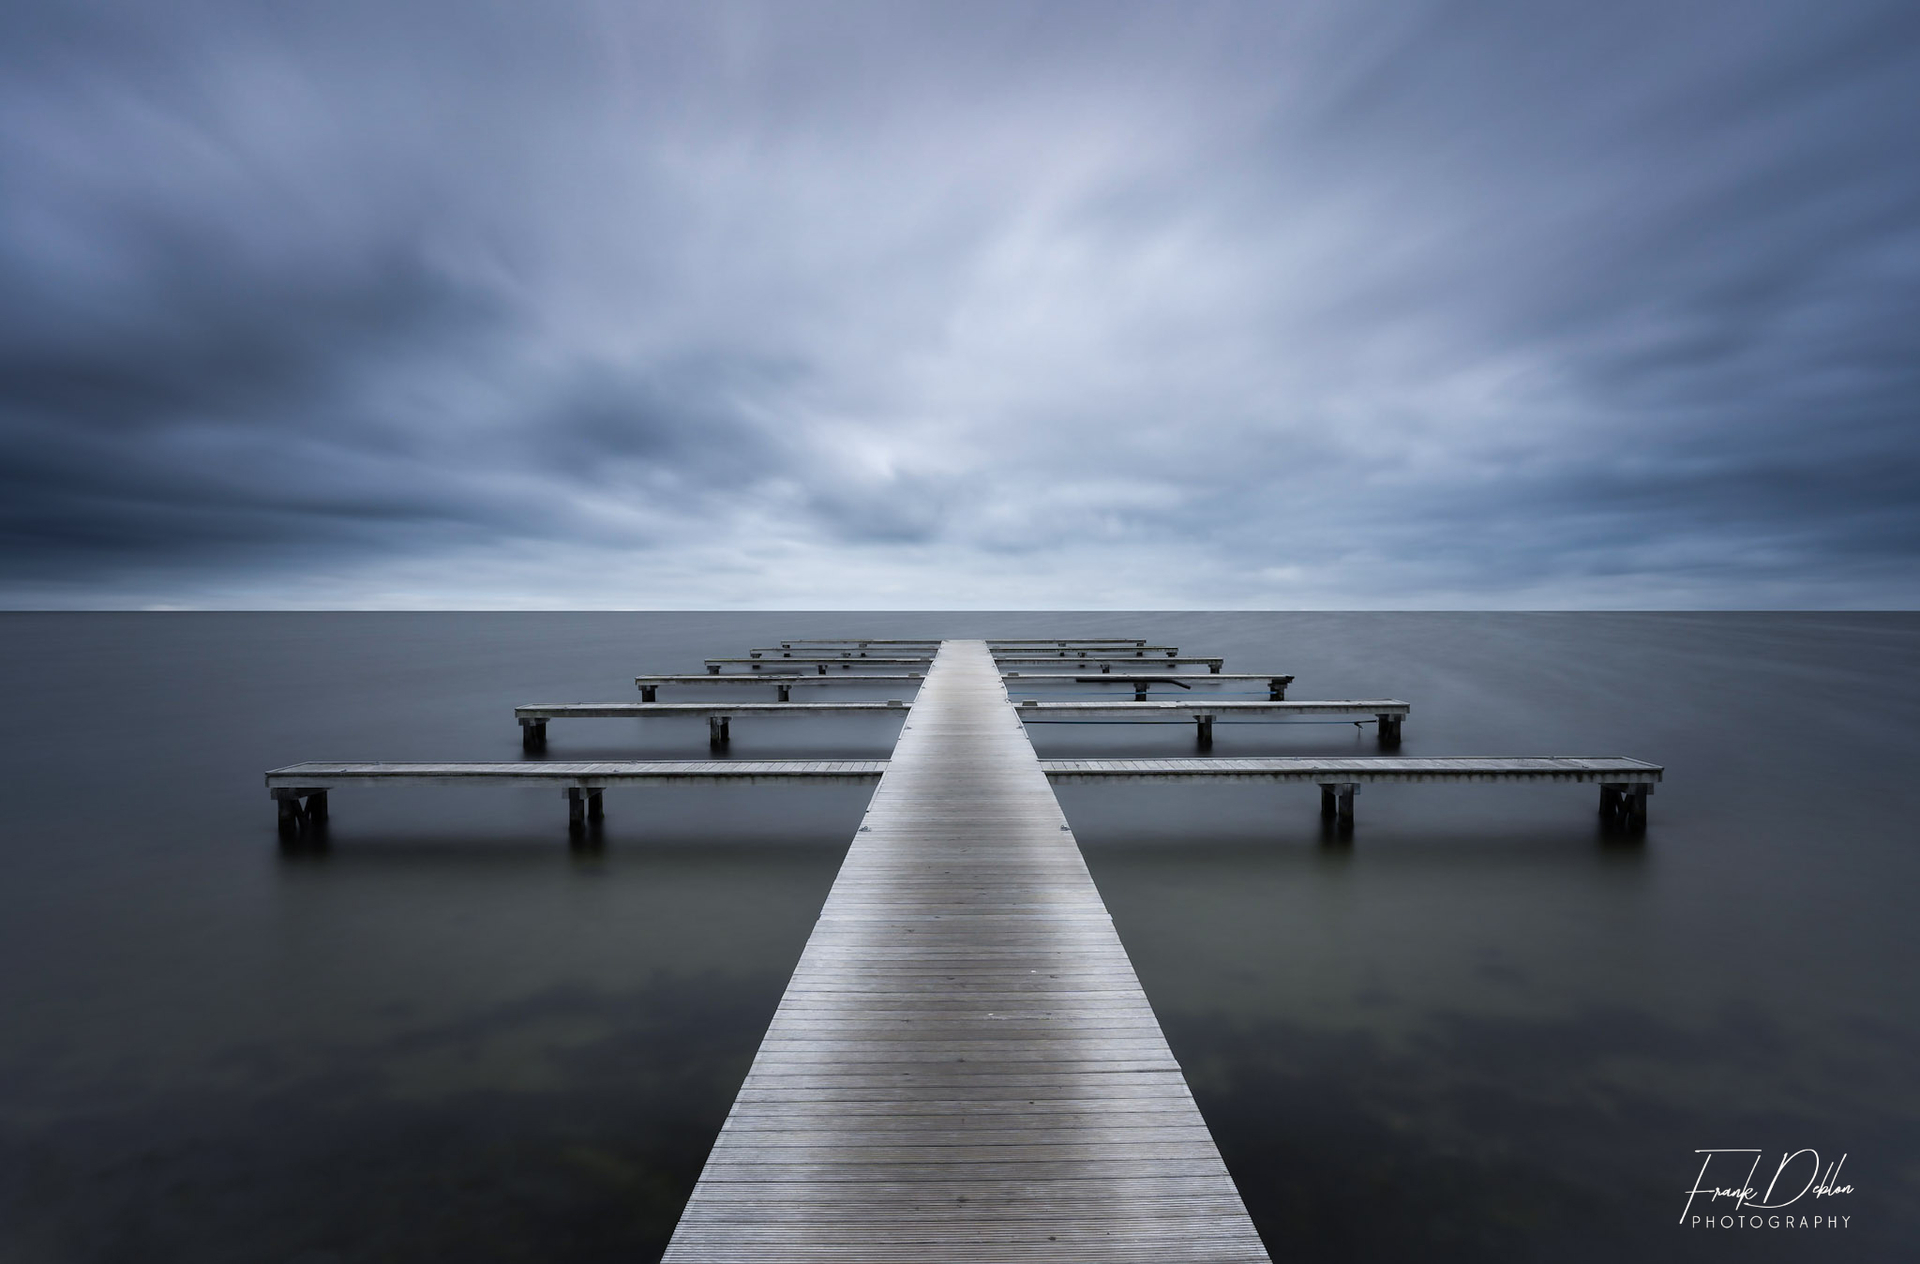
The filter with the hard transition H-GND is mainly intended for open transitions, such as on the water, with a tight, straight horizon.
The soft transition S-GND is most suitable for a horizon/transition that is not completely straight and where there are also objects in the transition, such as trees.
A filter with an M-GND has a slightly harder gradient, but can also be applied to transitions that are not entirely straight, but be careful with buildings and the like that you do not see a transition stripe in your photo.
The filter with the hard transition H-GND is mainly intended for open transitions, such as on the water, with a tight, straight horizon.
We hope that this information will contribute to your photography pleasure.
Comments (0)
No comments found.